HRYC
Super Simple Sock Pattern
The pdf pattern is now available.
After having a surprisingly tricky time finding a basic sock pattern for new sock knitters, we’ve written up our own. Knit from the cuff down, with no fussy details, this is a great sock for beginners and experienced sock knitters alike. The sample in the photos was striped – we used 2 skeins of Knitsch Sock ‘Caboose’ and one of ‘Plain & Simple’. Caboose was used for the cuff, heel and toe, and striped every 2 rows in the body of the sock with Plain & Simple. The pattern uses a short row heel – so don’t fret when it comes to the heel turn and you aren’t knitting across all of the stitches. By the end of this pattern section all stitches will be taken care of. You can find a pdf of the pattern and extra patterns notes on Ravelry.
Yarn: 2 skeins of Knitsch Sock or 100g of sock yarn
Needles: 2.50mm 80cm fixed circular, or 2.50mm double pointed needles
Sizes: Small (medium, large, X-large)
Gauge: 30 sts x 44 rows = 10cm
Abbreviations:
CO - cast on
K – knit
p – purl
ssk – slip, slip, knit
k2tog – knit two stitches together
p2tog – purl two stitches together
sl – slip the stitch from the left hand needle to the right needle without knitting
Pattern:
CO 60 (64, 68, 72) stitches Set up row: k2, p2, repeat until end next row: k2, p2, repeat until end. Join in the round, being careful not to twist. Place a marker to mark the beginning of the round. Split the number or stitches evenly across 2 needles (the magic loop using the circular needle) or 4 needles (if using double pointed needles).
Next row: k2, p2, repeat until end repeat rib pattern until cuff measures 2.5cm
Next row: knit Work in stocking stitch until leg measures approx 17cm or is desired length.
Heel flap: This section is worked flat over 30 (32, 34, 36) stiches. The other half of the stitches are held on the cable of your circular needle or on two dpns and are not knit at all until the heel section is completed. You will be turning your work as this part is knit flat rather than in the round.
Next row starting from marker: *sl1, k1, repeat from * 14 (15, 16, 17) more times 30 (32, 34, 36) stitches have been worked
Next row: turn work, *sl1, p to end
Next row: sl1, k2, *sl1, k1, repeat from * to end
Next row: sl1, p to end
Repeat these four rows 6 (7, 8, 9) more times, or until heel flap is length required. End on a purl row.
Heel turn: The heel turn is the bit that gets most people unstuck. As long as you follow the instructions word for word, and don’t worry about the stitches you aren’t knitting, it’ll make sense in the end.
Row 1: (right side of work) sl1, k16 (18, 18, 20), ssk, k1, turn work row 2: (wrong side of work) sl1, p5 (7, 5, 7), p2tog, p1, turn row 3: sl1, k to 1 st before gap, ssk (1 st from each side of gap), k1, turn work row 4: sl1, p to 1 st before gap, p2tog (1 st from each side of gap), p1, turn
Repeat rows 3 and 4 until all stitches have been worked. 18 (20, 20, 22) sts remain.
Knit back along the heel stitches, on the right side of your work.
Gusset: In this section the stitches along the side of the heel flap are picked up and knit, the top of the foot is now knit, the stitches down the other side of the heel flap are picked up and knit, and the sole of the foot is also worked.
Next row: Pick up and knit 14 (15, 17, 19) stitches along the heel flap, knit 30 (32, 34, 36), pick up and knit 14 (15, 17, 19) stitches along the heel flap, k9 (10, 10, 11), place new beginning of round marker.
Row 1: 23 (25, 27, 30) sts, k2tog, k30 (32, 34, 36), ssk, k to end of round Row 2: knit all sts
Repeat these two rows, knitting 1 less stitch before each k2tog on each repeat of row 1. Continue until 60 (64, 68, 72) stitches remain.
Knit in the round until the foot section reaches where your toes start (what I fondly refer to as ‘toe cleavage’).
Toe decreases: Making a space for your toes!
Row 1: k12 (13, 14, 15), k2tog, k1, place marker, k1, ssk, k24 (26, 28. 30) k2tog, k1, place marker, k1, ssk, k to end Row 2: knit Row 3: k to 3 sts before marker, k2tog, k1, slip marker, k1, ssk, k to 3 sts before marker, k2tog, k1, slip marker, k1, ssk, knit to end.
Repeat rows 2 and 3 four more times.
Repeat row 3 until 30 (32, 34, 36) stitches remain. The beginning of round marker should be in the centre of the sole stitches. Break yarn and seam live stitches together using kitchener stitch.
If you like, you can wash and block your socks by laying them flat to dry. I’m usually much too impatient for this and put them on immediately. Enjoy! If you have any questions, please email tash@knitschyarns.co.nz.
Technology, baby!


Simple Spring Patterns - new knitters ahoy!
The number of people taking up the needles is noticeably increasing - lots of my personal friends have been inspired of late, which fills me with joy. It means i'm on the hunt for patterns that are beautiful finished objects and feature just one or two techniques that are challenging enough to keep a new knitter interested but not so hard that they throw their work in the corner in frustration.
Here's a bunch of easy going projects that are perfect to transition into warmer weather knitting.

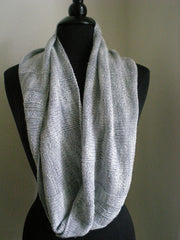
Mira's Cowl - a drapey 4 ply cowl that will be lovely to throw over your head on a summer evening

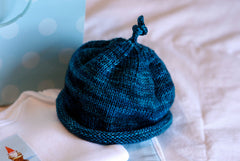
Easy Peasy Newborn Sock Hat - cuteness!

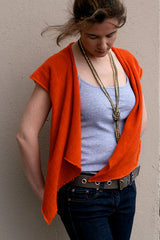
Terribly Simple by Caitlin Ffrench - seriously, awesomely simple but a great shape and you can use any yarn your heart desires.

Carol Feller's Adrift: besides the fact I LOVE this colour, this is a good foray into a simple garment. In fact, I might just make one. Going by the projects on Ravelry it looks like people have used 4ply yarn with no modifications with success.
Do any of my tried and true knitters have any simple pattern suggestions for our newbies?


