HRYC
Tour de Fleece
Tour de Fleece? Tour de WHAT?!
Tour de Fleece is an annual spin-a-long that started way back in 2006 by someone called Star Athena. The idea is, you pick a challenge, and spin during the Tour de France. Simple! It can be from the smallest challenge to something completely absurd, and you can join a team to compete in if you want to take it seriously. I've joined both Team Aotearoa and Team Ashford, but I need to figure out exactly what it is I want to achieve.
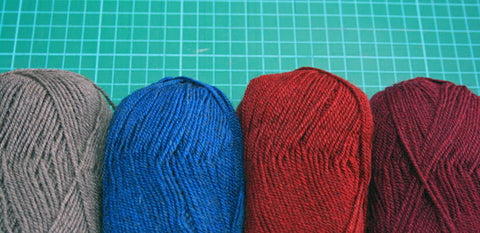
The most worrying part is...I don't have much of a fibre stash. Not counting shop fibre, this is my entire collection of spinning fibre:

Both from Spinning A Yarn. The plan is to spin both of these into something or other. To make up for the lack of stash, i've rummaged around the shop and found some bits and pieces to put through the drum carder.

The plan is, simply, to spin every day. It'll be my daily reward for getting other less fun tasks done. Are you Tour de Fleecing? I can't wait to what everyone achieves during the three weeks. And no, you don't have to watch any real cycling if you don't want to.
If you fancy a go with our drum carder, you're more than welcome to come and use ours any time. Ask nicely and we'll even let you take it away for a spell for a small fee and refundable bond. Ours is a fine 72PPSI carder, suitable for pretty much anything except raw fleece and making wild yarn batts. We're still learning the ins and outs of the drum carder, but if you need any help feel free to give us a yell.
Happy spinning!
xx Tash
Lana Grande
I would like to swim in a pool of Lana Grande. Like a ball pool, but with yarn. Wouldn't that be amazing?

(I seem to have lost my photography mojo. I've you've seen it, send it back this way!)
It'll probably do better to be knit up into something incredible, though.

Umaro by Brooklyn Tweed(image copyright Jared Flood)

Rapunzel Cowl by Tanis Grayfor Cascade


Ovate by Tori Gurbisz
or, our favourite:

The Big Snowy Owlby the Purl Bee.
We'll also be ordering in Spud & Chloe Outer, another great super bulky yarn, which should be here in a couple of weeks. Hooray! Have a great Friday!
More thoughts on Thermal.
Strange coincidence that shortly after having blogged about my first ever knit garment, Thermal, we've got more stock of the same yarn I used for it - Naturally Haven.
Why did I choose it? Because it was soft, had a beautiful hand, and was machine washable. It's safe to say that after 5 years of wear, it still looks fantastic.
In the same line, we also now have Naturally's Waikiwi on the shelves. The best thing about Waikiwi? It's PERFECT for socks. A mix of NZ merino, possum, nylon and silk mean it is designed for the wear and tear socks are subjected to. It almost seems a shame just to put it on your feet, though. Wouldn't it also make a glorious Thermal? I think so.
I'm trying to force myself to finish knitting my second Rocky Coast before casting on anything new...but with all this exciting stock arriving, it's proving a challenge! Knitting and daydreaming about future projects will have to do for now.

I'm having a weird old weird day. If you're having one as well, or simply feel like getting out of the house, it's knit night tonight (Thursday). Come on by for some yarn squishing, knitting and tea. And toffee pops. And whatever else I can rummage up for you. We'll be here, knitting, from 7pm - 9pm.
xx Tash
Warm Woollen Mittens
Is it 'woollen' or 'woolen'? I don't know. Either way, it's definitely time to be wearing them. I've never been much of mitten knitter. I'm not sure why.
So I asked on Facebook for some pattern suggestions, and here's what was suggested:

Susie Rogers Reading Mitts by Susie Rogers (free!)

Birdies Mitts by Julia Davies (free pattern!)

Rainbow Kid Mittens by Emilie Williams (free pattern!)

Snap Dragon Flip-top Mitts by Ysolda Teague
And one person requested an image of kittens in mittens, so how about kittens on mittens?

Meow Mitts by Tiny Owl Knits
Happy knitting!
xx Tash
Storm times need warm times.
It's been a bit stormy around here lately. And following the storm, a lot of rain (and snow for some parts). Lots of people were without power, and our flat lost a skylight. Having a hole in the roof makes life a bit chilly! From where i'm sitting right now I can see a patch of blue sky, and the rest of the week is meant to be sunny but cold.
When it's this cold I immediately turn to my favourite wearable hug - and the first garment I ever knit. The pattern is Thermal by Laura Chau from the Winter Knitty way back in 2006. It's warm and makes me happy whenever i'm wearing it.

Knitting Thermal was a big deal. Choosing out the yarn I had two options: cheap or expensive. As my first garment, I was worried about if it would turn out ok. Concerned that I would finish it, hate it and never wear it. Out of the two yarn options, neither had the colour I wanted. In the shop, tossing up between the two, it was either scratchy (cheap) or soft (expensive).
I weighed up the options. I could spend twice as much on the yarn and have something warm and snuggly. Or I could save money and knit with something not-so-nice. A 4ply jersey is a big time commitment, and I figured that even if I didn't love the end result, I could just wear it around the house.
I spent the extra, and five years later I rejoice the moment it gets cold enough to wear it again. The yarn has stood the test of time, and I thank my past-self for selecting the better quality option.
At Holland Road we only stock great yarn. I learned my lesson early on that investing in great yarn for projects is absolutely worth it.
Anyway: I need another one. Or, rather, I need a pullover / jersey / sweater that is light, long sleeved, and just big enough that it will go over a top but under a coat.
Hunting through Ravelry I have so many options!


Stasis by Leila Raabe / Bayside Pullover by Hannah Fettig


Raindrops by Tincan Knits / Framed pullover by Hannah Fettig
I think i'm leaning towards Stasis in Zealana Rimu Fingering, or Raindrops in Spud & Chloe Fine. Or maybe Knitsch Sock. Hmmm! Or both patterns? There's no such thing a too many hand knit jerseys, after all...
Oh, and when I finished Thermal - I wasn't in love with it. I was super judgey about how it fit, and all my old hang-ups about awful hand knit garments came to the surface. I forced myself to wear it anyway, and stopped caring about if it was flattering or not. Wearing something that made me happy and warm was the most important thing.

Image from They All Hate Us via Pinterest
Have a warm and happy and knitty weekend!
xx Tash